Mostrando entradas con la etiqueta Homemade Recipes. Mostrar todas las entradas

19.9.13

Biscoitos da avó

La abuela Isilda es una excelente cocinera. 
Conocedora de los secretos de la culinaria portuguesa tradicional, elabora platos sencillos, sabrosos y siempre sorprendentes. Como perteneciente al país vecino, lo que más me sorprende de sus recetas es el uso que hace de las hierbas aromáticas y los condimentos. Nunca los añade en exceso, pero de algún modo consigue el equilibrio perfecto, el punto exacto de sabor donde ningún ingrediente enmascara al resto. De todos ellos mi favorita es la hierbabuena, especialmente cuando flota sobre un caldito de gallina y arroz casero.

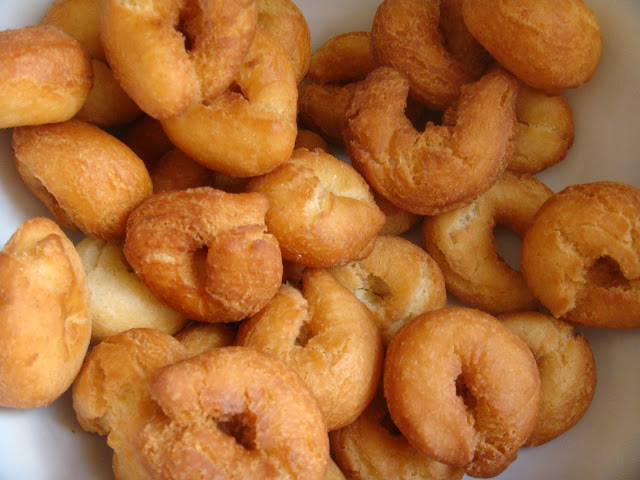
A continuación adjuntamos su plato estrella en el campo de la repostería. Es tan alabada, que en su círculo más cercano esta receta lleva directamente su nombre. Os recomendamos probarla. Recién hechos, los aritos con azúcar y canela son sublimes. 

- 1 huevo
- 4 chucharadas de leche
- 6 cucharadas de azucar
- 1 cucharada de mantequilla líquida (sin hervir)
- harina de trigo 

Primero se mezclan todo los ingredientes en un bol, a excepción de la harina. Cuando tenemos una mezcla homogénea, añadimos harina poco a poco, hasta formar una masa elástica pero densa y consistente. Se seperan pequeños trozos de masa y estiran sobre la mesa en forma de rollitos. Finalmente, se juntan los extremos hasta formar una rosquilla.

Se calienta aceite de girasol abundantemente y se sumergen las rosquillas cuando esté a alta termperatura. Una vez fritos, se pasan por azucar y canela y... ¡listos para comer!


Grandma Isilda is an excellent cook.
She knows all the traditional Portuguese food secrets and always prepares tasty and surprising dishes. We are from close countries, but I am always surprised about the use of herbs and spices. Isilda never adds too much, but somehow she gets the perfect balance, the exact point where no ingredient masks the other. My favorite herb is the peppermint, especially when it is floating on a homemade chicken stew.

We attach her best pastry recipe. It is so famous that it carries Isilda's name. I strongly recommend trying it. When fresh these small sugar and cinnamon rings are sublime.

- 1 egg
- 4 tablespoons of milk
- 6 tablespoons of sugar
- 1 tablespoon of melted butter (not boiled)
- Wheat flour

First mix all ingredients in a bowl, with the exception of the flour. When we have a homogeneous mixture, add flour gradually until dough is elastic but dense and consistent. Then separate small pieces of dough and stretch over the table in the form of rolls. Finally, the ends are joined to form a donut.

Deep fry the donuts in hot sunflower oil. Once fried, passed them through sugar and cinnamon and ... they are ready to eat! 


29.1.13

Arroz caldoso a la luz de las velas


Todos tenemos días vagos, lentos, viscosos... días que no nos apetece ni hervirnos un plato de pasta. En esos momentos solemos tirar de brebajes conocidos como "la sopa de brik": salados, con glutamatos y sobre todo, rápidos. Pero aunque compremos el más caro, el más "auténtico caldo de la abuela" o la "más secreta receta tradicional" todos saben igual, a agua con polvitos y sal. Y al final lo que comemos es un plato de fideos triste e insulso.

Por eso os cuelgo aquí mi caldito de verduras, que se hace en un plis y está mil millones de veces más bueno que los de mentira. Solemos comerlo por la noche, es ligero y sin grasitas. No hace falta olla exprés ni mil horas de cocción. Además es super económico, con el resultado puedes hacer sopa de fideos, arroz caldoso (versión de una receta tradicional valenciana y nuestra opción favorita) y puré con las verduras enteras que quedan al final.
Vamos, que no tienes excusa para no probarlo...

Ingredientes (4 personas):

- 4 zanahorias
- 4 patatas
- 2 chirivías
- 2 nabicoles
- 1 cebolla
- 1 nabo
- 1 puerro
- 1 ramita de apio

1.- Pelar y lavar las verduras
2.- Ponerlas en una olla y cubrirlas con una buena cantidad de agua, casi hasta el borde pero sin apurar demasiado para que no se vierta al hervir
3.- Salar al gusto
4.- Cocer a fuego medio unos 40 minutos, hasta que las hortalizas estén blandas o puedas traspasarlas con un cuchillo
5.- Sacar el caldo a un cazo, hervir junto con una taza de arroz por persona (arroz bomba o redondo, que suelta más almidón y traba el caldo). Cocer 15 minutos
6.- Cortar trocitos de hortalizas y añadirlos en el momento de servir
7.- Decorar con perejil cortado fino


We all have lazy, slow and viscous days ... days that we don't even want to boil some pasta. In these moments we often pull out some concoctions known as "brik soup": salted, with glutamates and above all, fast food. But even if we buy the most expensive, the most "authentic Grandma broth" or the "most secret traditional recipes", we all know these are mainly magical powders, salt and water. And, in the end, what we eat is a bowl of sad and dull noodles. 

So here I put my onw express vegetable broth. It can be done in a flash and is one billion times better than the fake ones. We usually eat it at dinner, for preparing light meals with no fat. It is also super cheap, and you can make with it many things such as noodle soups, rice soups (tradictional valencian recipe and our favorite option) and a pure with the remaining cooked vegetables.

So you have no excuse to test it ...

Ingredients (4 people):

- 4 carrots
- 4 potatoes
- 2 parsnips
- 2 nabicoles
- 1 onion 
- 1 turnip
- 1 leek
- 1 celery

1. - Peel and wash the vegetables 
2. - Put them in a pot and cover them with a good amount of water, almost to the top
3. - Season with salt
4. - Boil for about 40 minutes, until the vegetables are tender and can be pearced with a knife 
5. - Remove the broth (only the liquid) to another pan, boil it with one cup of rice per person (bomba or round rice, which releases more starch). Cook for 15 minutes 
6. - Cut some pieces of vegetables and add them to the soup when you serve it
7. - Garnish with finely chopped parsley


27.9.12

Coca de yogur

Cuando hice el post de Handmade lemonade os comenté que pondría una receta de coca. Aquí está.

A modo de aclaración, en la zona de Valencia se llama "coca" al bizcocho, es decir, a la receta base desde la cual puedes elaborar postres o pasteles más complejos. Sin embargo aquí es un producto en si mismo, siendo la más conocida la tradicional Coca de Llanda (algo así como "bizcocho de lata" en referencia a los moldes de hojalata en los que antiguamente se horneaba la masa). 
Esta receta la he escogido porque es rápida de hacer, necesita pocos ingredientes y da como resultado un bizcocho delicioso para desayunar, nada que ver con la bollería industrial del super.


When I made the Handmade lemonade post I said I'd would upload a recipe of "coca". So, here it is!
 

To clarify things, in the area of Valencia we call "coca" a basic cake, ie the basic recipe from which you can develop more complex desserts or pastries. However here it is taken as a product itself, being the most famous one the traditional Coca de Llanda (something like "biscuit tin" in reference to the tin molds in which formerly they were baked).

I chose this recipe because it is quick to make, requires few ingredients and results in a delicious cake for breakfast, completely different from the super industrial bakery.
 

:) 

INGREDIENTES:

1 yogur
1 aceite (preferentemente de girasol, es más ligero)
2 azucar (yo uso moreno)
3 harina
1/2 sobre de levadura
2 huevos


INGREDIENTS: 

1 yogurt 
1 oil (sunflower preferably is lighter) 
2 sugar (I use brown) 
3 flour 
1/2 packet of yeast 
2 eggs


ELABORACIÓN:

1.- El recipiente de medida es el envase del yogur, se vacía en un bol y se rellena con 1 medida de aceite, 2 de azucar y 3 de harina. Se añade el medio sobre de levadura y los huevos.

2.- Se mezcla con las varillas de la batidora hasta que queda una masa homogénea.

3.- Se traspasa a un recipiente apto para horno.

4.- Se le añade si se quiere algún ingrediente extra (nueces, pasas, galleta...) En este caso lleva trocitos de chocolate negro.

5.- Se hornea 30 minutos aproximadamente a una temperatura entre 180 y 200º C  

6.- Se desmolda al enfriar y... ¡a comer!


PREPARATION: 

1. - The measurements are done with the yogurt container. In a bowl we put 1 yogurt, 1 part oil, 2 of sugar and 3 flour. Add the half packet of yeast and the 2 eggs. 

2. - Mix it with the blender until it becomes a smooth dough. 

3. - Put the dough in an appropriate container for the oven. 

4. - You can add, if you want, some extra ingredient (nuts, raisins, cookie ...) In this case, black chocolate chips. 

5. - Bake for approx. 30 minutes at 180-200 ° C. 

6. - Take it out and let it cool down ... It's ready!


2.9.12

Handmade lemonade :)

Aunque el verano se termina no está de más tomarse una LIMONADA
Soy una fanática de esta bebida. Siempre que salimos a tomar algo dulce pido granizado de limón y si es posible, limonada casera.

Para comprender la adhesión incondicional a este cítrico debo remontarme a mi infancia. Pasé parte de mi niñez en mi pueblo, en la zona de La Ribera Alta. Es una pequeña población rodeada de campos de naranjos y huerta valenciana. En verano nos pasábamos el día en la calle jugando. Vivíamos en una casa de pueblo, en la zona antigua de la población y las calles eran estrechas y peatonales. Allí hace mucho calor durante los meses del estío, no se podía salir fuera hasta poqueta nit (es decir, hasta que el sol se ocultaba). Hacíamos siesta de tres a seis de la tarde para huir del calor. Yo odiaba aquellas horas, porque no podía salir a jugar y tenía que esperar a que las madres nos dejaran juntarnos para corretear por ahí. Pero la espera tenía su recompensa. 
Después de horas de juego y de la cena, los vecinos de la calle sacaban sus sillas a la puerta de casa para tomar la fresca y charlar al final del día. Se juntaban debajo de la farola principal, rodeados de los gatos de la zona y de las lagartijas nocturnas (dragonets) que se acercaban a la caza de mosquitos. En una mesita plegable ponían los refrigerios tradicionales y los compartían. Teresita sacaba su famosa Coca de Llanda (bizcocho popular, os haré la receta en otro post) y Didín su café granizado y, sobre todo, su aigüa llimó (agua limón o limonada) casera. Yo era una auténtica fan de esta receta. Ella la congelaba y poco antes de sacarla picaba un poco el hielo para que la tomáramos granizada. Todavía me recuerdo sentada junto a mis amigas en el corro escuchando las historias y los cotilleos de los mayores. Aquellas noches son un tesoro para mí. 

Han pasado años y mi infancia se ha ido junto con las noches en la calle, pero a cambio ha llegado a mis manos LA RECETA ORIGINAL de aquella limonada. Aquí os la presento para que podáis disfrutarla tanto como yo.


Although the summer is finishing we are still in time for a good old  LEMONADE. 
I am a fan of this beverage. Whenever we go out I usually order a frost lemonade or, if possible, a homemade one.

To understand the unconditional adherence to this citric drink I must go back to my childhood. I spent part of in a small village, in the area of ​​La Ribera Alta. This is a small place in Valencia, surrounded by orange fields. In the summer we used to spend our days plying in the streets. My family owned a small country house town in the old part of the village. The streets were narrow and pedestrian. You can imagine it is very very hot in summer. You actually can't go out
until
poqueta nit (ie, until the sun goes down). We'd take long naps from 15:00 to 18:00 so to escape the burning heat. I hated those long and boring hours with nothing to do, but wait until our mothers let us come together and play. But the wait was rewarded. 
After hours of playing and after dinner, the people of the street drew their chairs to their front doors to catch the cool breeze and chat until they went to bed. They met under the main lamp, surrounded by cats and nocturnal lizards (dragonets) who would come after the mosquitoes. In a folding table we shared traditional snacks. Teresita would draw his famous Coca de llanda (popular cake, I will make the recipe in another post), Didin the iced coffee and, above all, her aigua llimó (lemon water or lemonade). I was the biggest fan of this recipe. She would freeze it and shortly before bringing it to us, she'd brake the ice. I still remember sitting with my friends in the circle and listening to the stories of the biggest gossip. Those nights are a treasure to me. 

Years have passed and my childhood is gone along with the nights in the street, but instead a small treasure has come to my hands THE ORIGINAL LEMONADE RECIPE. Here I present it to you so you can enjoy it as much as I do.


SUPER RECETA:

- 3 o 4 limones
- 2 litros de agua (12 vasos de agua)
- 1 vaso y 1/2 de azucar blanco (250 gr. aprox)
- 1 ramita de canela


SUPER RECIPE:

- 3 or 4 lemons
- 2 liters of water
- 1 glass and 1/2 of white sugar (250gr. aprox)
- 1 cinnamon stick


1 Rayar la piel de los limones
    Scratch the lemon's skin


Exprimir los limones hasta conseguir 1 vaso y 1/2 de zumo
     Squeeze the lemons until you have a glass and a half of juice


 3 Mezclar la mitad del agua (es decir, 1 litro o 6 vasos de agua) con la   corteza rayada y todo el zumo de limón. Dejar reposar de 2 a 3 horas

Mix half of the water (i.e., 1 liter or 6 glasses of water) with all rind and grated lemon juice. Let it rest for 2 to 3 hours


4 Mientras la mezcla reposa, calentar en un cazo a fuego lento el vaso de azucar blanco con un vaso de agua. Hay que remover hasta que quede un líquido espeso. este paso se hace para que el azucar se disuelva totalmente en el agua y no queden grumos

While the mixture rests, heat the cup of white sugar with a glass of water in a pan with low heat. You have to stir until it becomes a a thick liquid. This step is done until the sugar is completely dissolved in the water and there are no lumps


5 Una vez conseguida la disolución, se añade el resto del agua (la otra mitad no utilizada) y la ramita de canela. Se remueve y se mezcla hasta llevar a ebullición. Se apaga el fuego y se deja enfriar

Having gained the solution, add the remaining water (the other half not used) and the cinnamon stick. Stir and mix until it boils. Turn off the heat and allow to cool down


6 Cuando todo se ha enfriado se mezcla y se cuela
   When all is cool, strain it


CONSEJOS DE PRESENTACIÓN:

- A mí me gusta dejarle un poco de corteza rayada, le da un toque natural

- Se puede tomar fría de la nevera, con hielo (picado o no, según gustos) o congelada

- Si se congela, sacar media hora antes de tomar para que se descongele un poco, lo suficiente para que haya líquido que permita picarla más facilmente. Así se podrá tomar granizada

- Se le puede añadir un poquito de licor blanco como anís, o un chorrito corto de ginebra o el vodka si quieres usarla como bebida de fiesta

- Mi favorita: limonada simple con tres cubitos de hielo, dos rodajas finas de jenjibre y una ramita de hierbabuena ¡Si la pruebas no la tomarás de otra manera!  


TIPS FOR THE PRESENTATION:

- I like to leave a little lemon skin, it gives it a natural touch

- You can have it cold from the fridge, with ice (crushed or not, according to taste) or frozen

- If frozen, put it out of the freezer about half an hour before you serve it, so that there is enough liquid.

- You can add a little white anise liquor, or a shot of gin or vodka if you want to use it as a party drink

- My favorite: Simple lemonade with three ice cubes, two thin slices of ginger and a sprig of mint. If the taste this you will not want it any other way again ever!


11.4.12

Browny brutal

No somos muy aficionados al dulce, ni hacemos a menudo recetas de pasteles o tartas pero... buah, ha llegado a mis manos esta fórmula secreta de la felicidad. Se trata de un super browny casero de chocolate!
Sí: es excesivo, denso y altamente calórico pero... de verdad, es la bomba. Fácil de hacer, si tenéis que llevar postre a una cena o comida de amigos quedaréis como señores.

Ahí va:


Ingredientes / Ingredients
 

We are not very fond of sweet, and seldom we take time do bake cakes but ... wow, the secret formula to happiness has just landed in my hands. It is a super homemade chocolate browny! Yes: it is very dense and highly caloric but ... it is the bomb. You'll find it very easy to do, and if you have to bring some dessert to a dinner or lunch with your friends, this is ideal.
Here it goes:

3 huevos / 3 eggs

100 gr. de harina / 100 gr. flour


125 gr. azúcar / 125 gr. sugar

1/2 vaso de agua / 1/2 glass of water

200 gr.chocolate negro, mínimo 55% cacao puro
200gr. black chocolate, 55% minimum pure cocoa


125 gr. mantequilla sin sal
125 gr. of saltless butter


1.- Batir el huevo y el azúcar en un cuenco
         Beat the egg and the sugar in a bowl


2.- Añadir la harina y batir hasta que la mezcla esté homogénea 
         Add the flour and beat until the mixture is homogeneous
 

Más o menos así

:)

More or less like this


3.- En un recipiente que se pueda poner en el microondas, partimos el chocolate en trozos e incorporamos el agua. Lo dejamos fundir dos minutos aproximadamente. Mezclamos el chocolate fundido y el agua y añadimos la mantequilla cortada en trocitos.

NOTA: si rechazáis las moderneces y queréis derretir el chocolate al baño maría como antaño, el resultado es el mismo.


In a container that can be put in the microwave, we break the chocolate into pieces and add water. We leave it for two minutes until it melts. Mix well the melted chocolate with the water and add the butter, previously cut into small pieces.


4.-Incorporamos el chocolate fundido en la preparación y mezclamos bien. Ponemos la preparación en un molde untado con mantequilla y lo metemos al horno (200ºC) durante 15-20 minutos.

We incorporate the melted chocolate in the preparation and mix well. Put the mixture into a buttered mold and put in the oven (200ºC) for 15-20 minutes.


5.- En el momento de sacar del horno, el browny no debe estar completamente cocido en la parte central: lo podemos comprobar hundiendo la hoja de un cuchillo. Dejar enfriar 15 minutos antes de sacar del molde.

Upon removing from oven, the browny must not be fully cooked in the middle: we can see it by sticking the tip of a knife. Let it cool for 15 minutes before removing from mold.


¡¡¡Ya nos contaréis qué os parece, está increíble!!!
Para despedirnos, unos enlaces relacionados con el mundillo de la cocina (con gente que lo hace muuucho mejor que nosotros... pero claro, es que están en su elemento).


We hope you like it is incredible! 
To say goodbye, some links related to cooking world (with people who do it waaaaay better than us ... but of course, they are in their natural habitat).
 

* Unos cuantos blogs cocineros / some cooking blogs:


* Videos molones de cocina /cool cooking videos


datafone on Vimeo